Migrate Public Folders to Office 365 Effortlessly – Elevate Your Collaboration!
Microsoft Exchange Server & Office 365 are the two most successful and popular services used by billions of businesses & users across the globe. It changed the corporate world’s business management system entirely. However, users often want to migrate public folders to Office 365 for several reasons, and this task is not as simple as it sounds. Additionally, it is complicated & that’s why users get confused.
Here, we are going to explain the solutions for public folder migration to Office 365. We are going to cover both manual & automated solutions. Apart from that, the benefits of these methods are also there to make a better choice. The reasons for such operation are a key element to getting in-depth knowledge, that’s why we start our discussion from the same.
Let’s explore the reasons for such an operation with the help of a generic user query of a real user eagerly finding a solution.
“Hi, my name is Alex & I’m from South Carolina, U.S. I’m trying to perform Exchange On-Premise to Office 365 migration as our organization is shifting from On-Premise infrastructure to Cloud infrastructure. Even after several attempts, I’m unable to get the expected results. There are multiple drawbacks to the manual method & which is why I need a genuine solution for public folder migration to Office 365. Please suggest a reliable solution if any.”
As the above user query states how difficult it is to migrate Exchange public folders to Office 365 without the right knowledge & technical skills.
Why Should You Migrate Public Folders to Office 365?
Now, understand the reasons for moving public folders to Office 365 –
- Eliminate the need for on-premises server maintenance.
- To get access to your files from anywhere in the world at any given point in time.
- Privacy & security are much better in the Office 365 ecosystem that protects your data.
- Continue showing errors like Exchange not receiving external emails also become the reason for migration.
- Office 365 offers identical UI regardless of the system that helps users in operations.
How to Perform Public Folder Migration to Office 365?

Moving public folders to Office 365 is a straightforward task with accurate solutions and stepwise instructions. The following sections describe the same to make transition a breeze i.e.
- Automated Solution
- Exchange Management Shell
- Microsoft Public Folder Migration Script
- Export Public Folders as PST via Outlook
Each method offers unique advantages and disadvantages according to your organization’s needs. Therefore, choosing the right approach among them is the key to successfully migrate public folders to Office 365 with minimal disruptions. Let’s take a closer look at each method and understand which method suits your needs best for this procedure.
Method #1. Reliable Automated Solution
Now we are well aware of all the loopholes present in the manual solutions like complexity, time consumption, and potential risks of data loss. That’s why users face critical challenges in between operations. To counter such situations here we understand the modern and 100% secure solution i.e. SoftwarePro Public Folder Migration Tool. It is the best way to get customized results as per your needs.
Guess what? You can try this utility for free with 24/7 support. So, try its robust features and performance today without paying any money.
Such marvelous tools are a perfect choice for users to get accurate results without any data loss or file corruption issues. The best thing about this solution is one can export mailbox to PST from offline EDB file also.
Interested to know how it works? Then, follow the below-mentioned steps with the respective images to migrate public folders to Office 365 efficiently.
- Step-1. After installing the solution, click on the Add File button.

- Step-2. Now, a new window is open, in which two options are available to upload files i.e. Select file & Search file.

- Step-3. Afterward, choose any of the two options for scanning i.e. Quick & Advance.

- Step-4. Hit “Yes” to save the scanning result.

- Step-5. Verify your data in eight different formats as shown in the screenshot.

- Step-6. Click on the Export button and select Office 365 as the destination platform.

- Step 7. Finally, click the “Export” button to initiate public folder migration to Office 365 operation.

Astounding Features of the Best & Reliable Automated Software!
Various benefits can help users reduce their efforts to accomplish the target results. We suggest only this smart solution after understanding all the pain points of users. Let’s explore the advantages that you can enjoy by choosing this to migrate public folders to Office 365 –
- It can simply execute the entire operation while maintaining data integrity & security. There is no chance of any threat to damaging data files. It can even recover purged Emails Exchange 2019 & other versions.
- Time is money & that is why this software aims to get the work done in the minimum time possible. Its advanced algorithms simply complete the work in the least possible time with maximum accuracy.
- Another benefit that users get is plenty of filters that can reduce the workload of users. Category & Date Filters make it easy for users to migrate selective information that no other solution offers to migrate public folders to Office 365.
- Bulk migration is a piece of cake for this utility. Other solutions usually fail when it comes to bulk data migration. However, this solution fluently manages the transition of bulk data files of the Exchange server.
- With this, you can repair multiple EDB Exchange database (if they are corrupted) & then migrate them to their destination location.
Method #2. Use the Exchange Management Shell (PowerShell)
Running PowerShell commands is not an easy thing for every user. Especially, those who don’t know about the EMS and how to fix PowerShell errors if occurred during public folder migration to Office 365 tasks. Therefore, it is considered to not opt for this, if you are not aware of the loopholes of this solution. However, for technical users, this method is quite effective because it makes things automated and quick.
Before moving public folders to Office 365 first go through the prerequisites which are:
- Exchange Management Shell access
- Administrative permissions on both the on-premises Exchange and Office 365 environments
After ensuring these two points, let’s start with the main procedure:
- Create a Migration Endpoint:
New-MigrationEndpoint -Name "YourEndpointName" -ExchangeRemoteMove
- Create a Migration Batch:
New-MigrationBatch -Name "PublicFolderBatch" -PublicFolder -SourceEndpoint "YourEndpointName"
- Start the Migration Batch:
Start-MigrationBatch -Identity "PublicFolderBatch"
- Monitor the Migration:
Get-MigrationBatch | Get-MigrationUser
- Complete the Migration:
Complete-MigrationBatch -Identity "PublicFolderBatch"
Method #3. Microsoft Public Folder Migration Script
This solution is complicated for moving public folders to Office 365 efficiently. So, first, go through these instructions and apply the mentioned cmdlets in a test environment to prevent errors before initiating the actual transition.
Commands for public folder migration to Office 365:
Phase 1. Prepare the Source Environment
- Identify Public Folders:
Get-PublicFolder -Recurse | Select-Object Name, Identity
- Create a CSV File:
Get-PublicFolder -Recurse | Select-Object Name, Identity | Export-Csv -Path "C:\PublicFolders.csv" -NoTypeInformation
Phase 2. Prepare the Target Environment
Using Exchange Admin Center (EAC) create a public folder in Office 365, then only you can create a transition endpoint –
New-MigrationEndpoint -Name “OnPremPublicFolderEndpoint” -ExchangeRemoteMove
Phase 3. Use the Microsoft Public Folder Migration Script to Migrate Public Folders to Office 365
- First, save the commands from the Public Folder Migration Scripts & Mail-enabled Public Folders – directory sync script.
- For PowerShell scripts, you have to click on SourceSideValidations.ps1.
- Now, scan Exchange by running this SourceSideValidation.ps1 script within the PowerShell. Fix any issue using –
.\SourceSideValidations.ps1
- Connect to Exchange Online:
Connect-ExchangeOnline -UserPrincipalName <software@yourdomain.com>
- Execute the Migration:
.\PublicFolderMigration.ps1 -SourceMailbox "<SourceMailbox>" -TargetMailbox "<TargetMailbox>" -PublicFolderMailbox "<Office365PublicFolderMailbox>"
- Monitor the Migration:
Get-PublicFolderMigrationStatus
Method #4. Export Public Folders as PST via Outlook
Before initiating the task, first ensure that Microsoft Outlook is installed on your machine because without it, this is impossible to migrate public folders to Office 365 via this solution-
- To start, in Outlook 2010, go to File > Open > Import, or for Outlook 2013, 2016, or 2019, navigate to File > Open & Export > Import/Export.
- Select the option to Export to a file > Outlook Data File (.pst) > select the Public Folder to export.
- Then click ‘Browse’ to pick a location to save the PST file and click Finish to complete the export.
- Now to import the files, download the Public Folders Migration Scripts and run the command to generate a CSV file:
.\Export-PublicFolderStatistics.ps1 MyServerName.csv
- Next, map your source Public Folders to Office 365 with the command:
.\PublicFolderToMailboxMapGenerator.ps1 MailboxSize ImportFilePath ExportFilePath
- After mapping, create a Public Folder in Office 365 based on the mapping file, and use the New-PublicFolder cmdlet to set up the folder.
- Finally, import the PST files into Office 365 using the Outlook Import/Export Wizard, and through EAC assign permissions to the Public Folder.
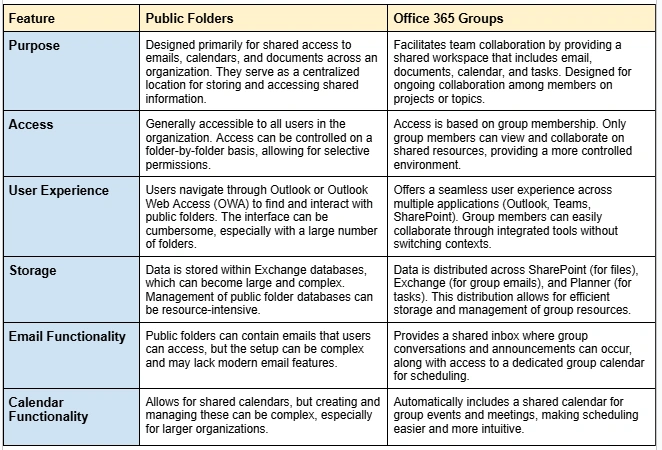
What are the Differences Between Public Folders and Office 365 Groups?
Using the below table, we will clearly understand the comparison between Public Folders and Office 365 Groups, and why Office 365 is the better option for storing crucial data:

Bring it All Together!
Now that we understand various aspects of this migration task, it’s time for the final say. We all know these operations can be hectic. This is because of the involvement of core technicalities. Therefore, automated software is a better approach to migrate public folders to Office 365, instead of manual methods which are complex and error-prone.
Hence, the main key point of this public folder migration to Office 365 operation is to select a wise method like the specified automated tool. This solution is not just a user’s favorite but IT experts also recommend this based on their own experience.


