How to Setup Gmail Account in Thunderbird?

Gmail is a webmail which provides free email service developed by Google. Users can access Gmail account by sign in to Gmail. In Gmail, every email is safely stored on the cloud. Gmail emails can also be accessed on local computers by email clients such as Thunderbird, Outlook, Apple Mail, etc. This post demonstrates the step by step method to setup Gmail account in Thunderbird. You can configure Gmail using either IMAP or POP.
Steps to Setup Gmail Account in Thunderbird
Step 1: Enable IMAP or POP in Gmail.
- Sign in to Gmail.
- Click on Gear icon and then select Settings.
- Click on Forwarding and POP/IMAP tab.
- Select Enable IMAP.
- If you want to add Gmail account using POP then select Enable POP.
- Click Save changes.
Step 2: Open Thunderbird and go to Tools menu, then click Account Settings.
Note: If you are starting Thunderbird for the first time, move to step 4.

Step 3: Click on Account Actions and select Add Mail Account.

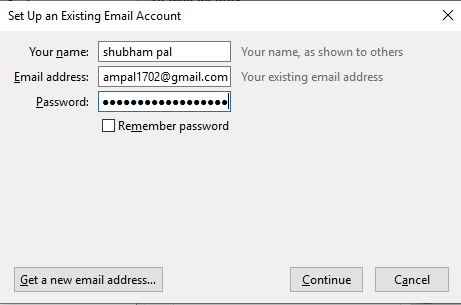
Step 4: Type your Name, Email Address and Password.

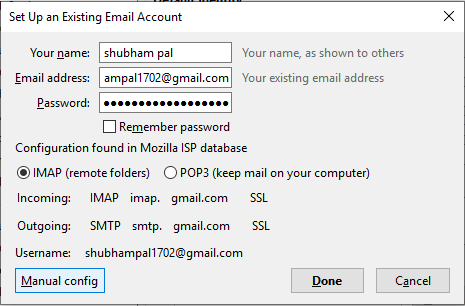
Step 5: Click on Continue button.
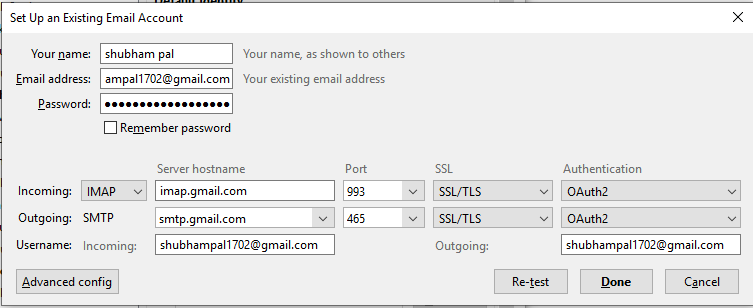
Step 6: click on Manual config.

Step 7: Choose the incoming protocol according to you.
For IMAP, server hostname- imap.gmail.com, port- 993/143, SSL, authentication- Oauth2.
For POP, server hostname- pop.gmail.com, port- 995/110, SSL, authentication- Oauth2.

Step 8: Choose the outgoing protocol(common for both).
SMTP:-server hostname- smtp.gmail.com, port- 465/587/25, SSL, authentication- Oauth2.
Step 9: Click on Done button. A verification window will open. Enter your credentials and click on Allow button.
Step 10: Wait for Mozilla Thunderbird to synchronize your Gmail emails.
Conclusion:
Mozilla Thunderbird is an email client in which you can access multiple Gmail account at once. But first, you will need to configure the email accounts. In this post, we have explained how to setup Gmail account in Thunderbird using IMAP and POP.


