Google Vault Migration to Office 365 Without Hassle
Summary: If you are looking for Google Vault migration to Office 365, then your search ends here. Office 365 is widely used for collaboration in organizations. Due to this, regular queries are generated for Google Vault to Microsoft 365 migration. Therefore, we have structured this article to solve this query in detail.
Microsoft 365 is one of the best platforms for large organizations. Therefore, most of the large organizations have already shifted from Google Vault to O365. The migration process from Google Vault to Office 365 is possible with two methods, manual and professional. But before exploring the solution of migrating Google Vault files to Microsoft 365. Let’s discuss the reasons for shifting to Office 365.
Table Of Content
Reasons to Migrate Google Vault to Office 365
There can be multiple reasons to move data from Google Vault to Office 365. Some of the key reasons are
- Office 365 provides robust security to the data, due to which the data becomes safe from attacks.
- By opting for O365, the collaboration of the team members is improved.
- To store all the information in one place, Office 365 is the best choice.
- Choosing an affordable and manageable platform is a tough task. But Office 365 is the one which is easy to manage and affordable too.
All these are the benefits of Office 365, that you can get after migrating data from Google Vault to Office 365. Now it’s time to know the solution on how to perform Google Vault to O365 migration.
How to Perform Google Vault Migration to Office 365?
The Google Vault data can be moved to O365 with the help of two possible methods. One is the manual method which uses the eDiscovery tool. The next one is a professional method that uses an automated tool. The manual method is not used widely because it has some limitations. Due to this, the experts also do not recommend it. Let’s discuss each one so that you can choose between them accordingly.
Migrate Google Vault to Office 365 Manually
The migration of Google Vault to Office 365 using the manual method requires two steps. One is for downloading all data from Google Vault into PST or MBOX files. The second method is for uploading the resulting PST file to the O365.
Step 1. Downloading Google Vault Data Using eDiscovery
Follow the below steps of the eDiscovery tool to complete the process of Google Vault migration to Office 365.
1. Login to the Source Gmail account and go to https://ediscovery.google.com/
2. In the Google Vault, press the Create button.
3. After providing the name and description for the matter hit the Create New Matter button.
4. Create a Hold by completing the details.
5. Click on the option of Search and choose
- All Data, Mail, and specific accounts.
- Enter the email address of the Source.
- Complete the details and tick the checkbox of Exclude drafts.
6. Hit on the Export button, suggest a name for the export, and choose the resulting file from PST or MBOX.
7. Now, Click on the Start Export button.
Note: A warning is also generated to inform you about the necessity of downloading data within 15 days to avoid the restart of the process.
8. In the last step, press the Download button.
Step 2. Upload Resulting file to O365
Now, the resulting file is downloaded. But it can be in the two formats. One is the PST and another is the MBOX. So there are two different scenarios for uploading the resulting file to O365 to complete the Google Vault migration to Office 365 process. Let’s deep dive into them.
Scenario #1. Import Resulting PST file to Destination
If you choose the option of PST, before clicking on the start export button. Then, the resulting file is the PST. You can import that file to Office 365 using the most efficient Office 365 Importer tool to migrate Google Vault to Office 365. This tool requires some quick steps to move PST files to Office 365.
This tool also provides complete data security in between the processes. An interactive dashboard is also there that can help you to track the whole process. A complete report is also generated after the completion of the process, through which you can analyze all the executed steps in detail.
Scenario #2. Upload MBOX to O365 Account
If the MBOX file is selected while exporting Google Vault data, then the resulting file is the MBOX. You can import MBOX to Office 365 using the MBOX to Office 365 Migrator tool for the completion of the Google Vault to Microsoft 365 process. It is proficient to import the MBOX files to the destination Office 365 account while managing the data hierarchy.
It generates a report after the process ends so that you can examine the executed steps. This tool can also be operated without the admin credentials. Because of its simple user interface, it is easy to use.
Limitations of the Manual Method
- It is a time-consuming process.
- It requires so much technical knowledge to perform the manual steps.
- There might be a chance of data loss if any of the steps are executed wrongly.
- The resulting file after export is valid for 15 days only if not downloaded.
- Requires an automated tool to import the resulting file to Office 365.
Google Vault Migration to Office 365 Professionally
The professional method is the best approach for shifting from Google Vault to Office 365. This method uses Office 365 migrator to complete the process. You do not need to be a technical person to use this tool. It has an understandable user interface. The tool is efficient enough to secure your data throughout the process. This tool has some key features that are
- Provides the Date filter for filtering the required data only.
- Having Re-Run, Retry, and Delta migration options.
- Provides a complete report to examine the executed steps.
- Option to set the priority on required accounts.
Migrate Google Vault to Office 365 Step-By-Step
Step 1. Download and launch the tool.
Step 2. Select Source and Destination as Google Vault and Office 365.
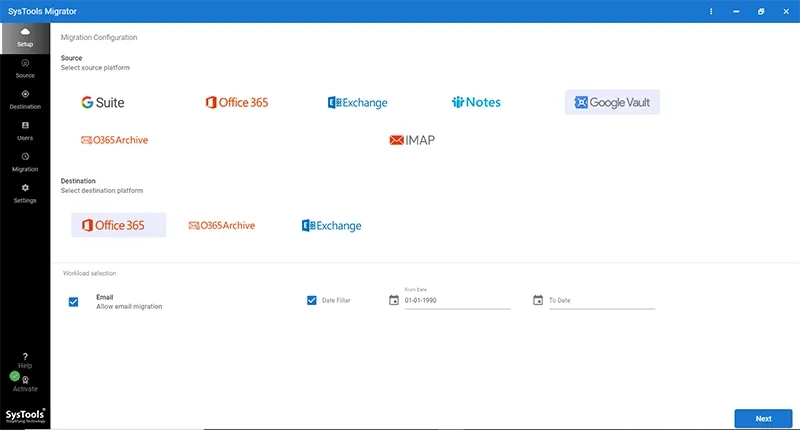
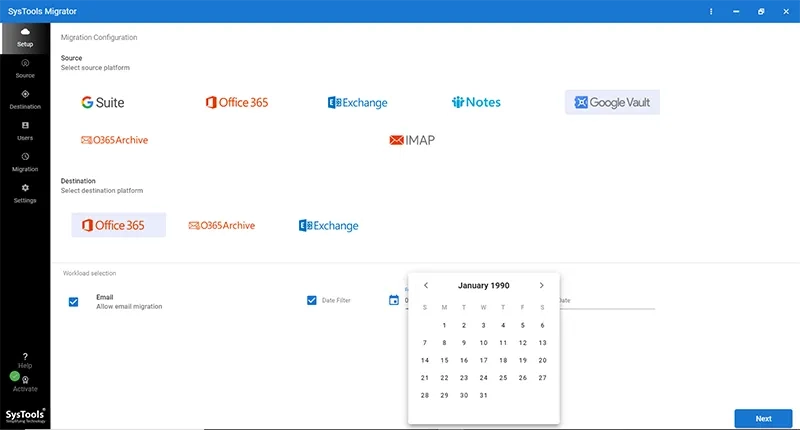
Step 3. Tick the checkbox of Emails & apply the date filter and then hit the Next button.
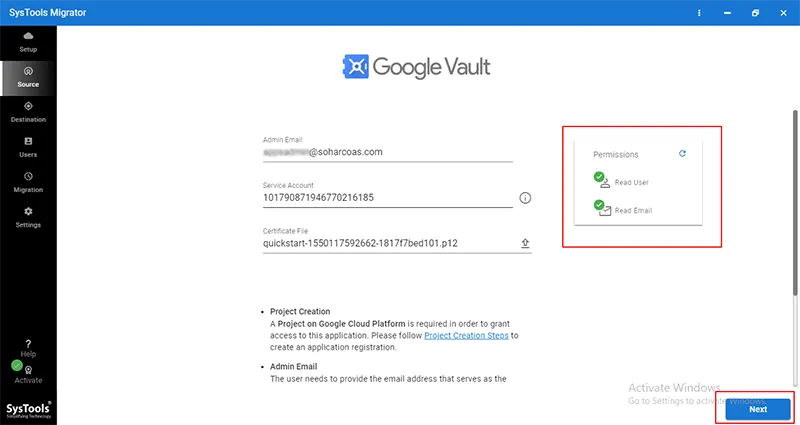
Step 4. Enter the required credentials in the Source tab and hit Next.
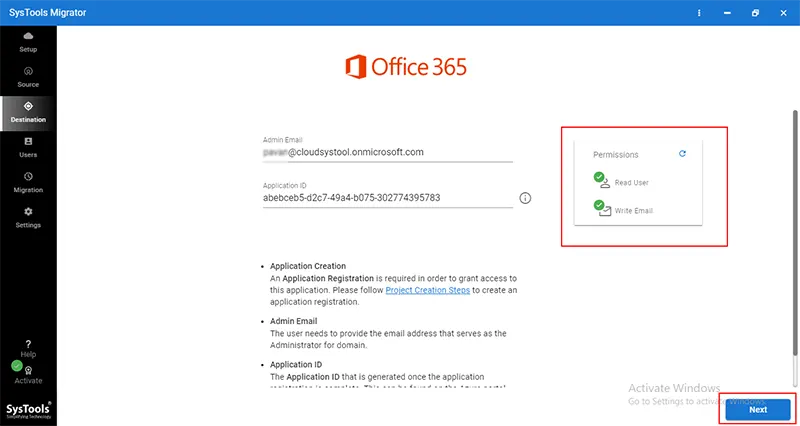
Step 5. Complete the destination details and Next.
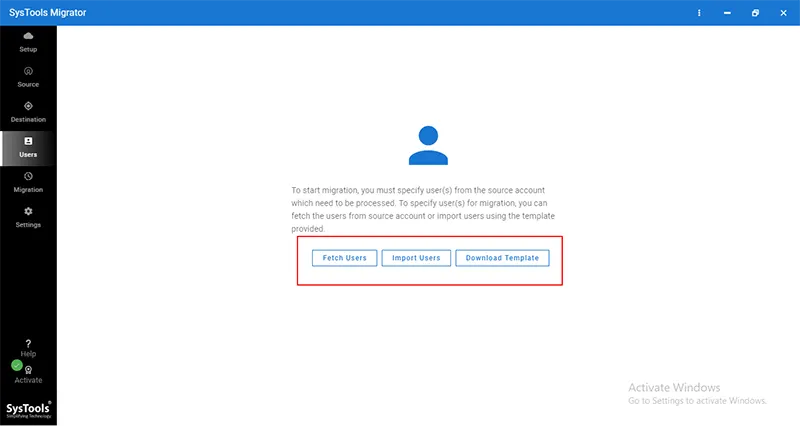
Step 6. Load all the required users into the tool.
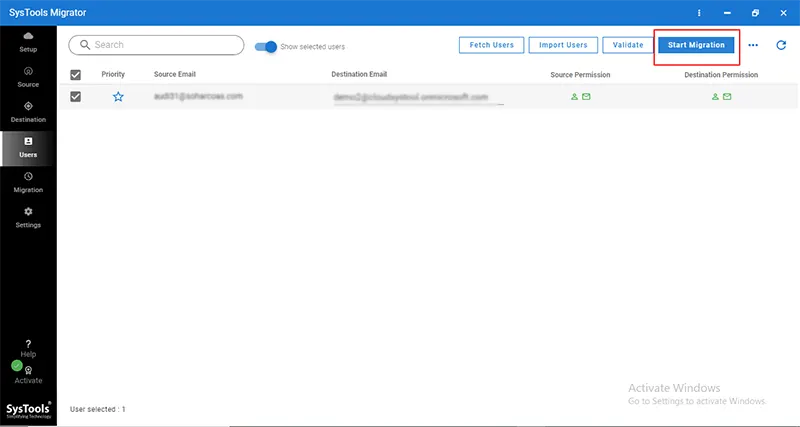
Step 7. Hit on the Start Migration button to start the process
Concluded Words
Because of the several benefits of Office 365, most organizations prefer O365 over Google Vault. That’s why through this write-up, we have explained how to perform Google Vault migration to Office 365 using two different methods. According to experts, the professional method is the best choice to migrate from Google Vault to O365.
Because the automated tool has some advanced features that help to complete the process efficiently. The manual method is not recommended to use due to its limitations. Hence the query is resolved.


