Execute Email Migration to Office 365 – Things to Know Before Migrating!
As more and more users are becoming aware of cloud computing, users from all over the world are coming up with new ideas & queries regarding the same. Today, in this write-up, we’re going to focus on one such query “How to Perform Email Migration to Office 365?”.
Multiple reasons make organizations make this critical decision of data migration. M&A activities, divestiture, etc, are the common reasons why companies make this decision. Apart from this, when an organization wants to perform Microsoft Office 365 migration, they also ask the same query.
Read this complete article to get all your answers to your query & simply follow the instructions mentioned below to make your migration process hassle-free. Admins who want to transfer the organization’s emails to Office 365, must follow this quick guide to executing this operation safely.
What’s the Pre-Migration Checklist to Consider Before Email Migration to Office 365?
There are some preparations that users need to do before starting their migration operation to make their project error-free. Let’s have a look at these crucial elements –
Step.1 Plan 3 Days Before Your Migration Operation
Users need a perfect plan & strategy for the successful completion of the operation. This must be started 3 working days before the actual operations. This step eliminates several issues at the first stage that other users have faced earlier.
It’s important to make your strategy sharp & simple for a smooth email migration to Office 365. Users need to prepare their Primary & Targeted accounts before they start transferring the data.
To make necessary changes in the account for further processing, follow the instructions below:
- Make sure the destination tenant is for the source Exchange Online domain.
- Establish a connection between the source and destination Office 365 accounts. Make a TXT file, once you’re done syncing your accounts.
- There can be a gap of 72 hours for the DNS record to show the circulation.
- Please make sure that no other application is using either the source or destination tenant mailbox.
Step.2 Set up Your Office 365 Cross-Tenant Migration Platform
- Prepare a list consisting of the mailboxes that are required to be migrated.
- Map the aimed and source tenant mailboxes, only if it is required with the ultimate goal to migrate mailbox data to exchange online.
Preparation of the Exchange Online Primary & Targeted Account
These prerequisites are essential for an email migration to Office 365, so don’t skip this part –
Step.1 Prepare Your Exchange Online Source Account
- Delete the Office 365 tenant’s designated email ID from any place it is set.
- Set all the URLs to their initial state after the completion of account configuration.
- With the help of the Lync admin portal, remove your license of Microsoft Lync.
- Create a setting to specify the default email IDs of the destination accounts
- At last, set all the distribution lists, email addresses on rooms & resources to their initial state.
Step.2 Prepare Your Exchange Online Destination Account
- Launch the destination Office 365 account & make new domains in it only if you are operating Active Directory Federation Services [AD FS].
- Allow all the necessary licenses & permissions required for the migration of data to a new account.
- Select your initial account as the primary address.
- The password of each & every mailbox is to be mentioned in the account domain only if the user isn’t using AD FS or the passcode sync facility.
- Now, just for the testing, examine the mail flow under different conditions.
Opt for the Most Advised Solution for an Email Migration to Office 365!
So here, we are using the modern approach to solve user queries. Microsoft’s MVPs & other IT experts recommend SoftwarePro Office 365 Tenant to Tenant Migration Tool to perform Cloud migration in a seamless way.
Exceptional Features of this Modern Approach
- This solution enables users to migrate multiple mailbox items like email, contacts, calendars, tasks, etc.
- The date filter utility is a smart feature that allows users to select migration.
- Users can easily migrate shared mailboxes & archive folders with the help of this modern approach.
- This tool can perform delta migration to transfer the newly arrived electronic mail to the destination account.
- Admins can easily migrate important accounts on a priority basis using the account-based priority migration option.
- A detailed migration report can be easily generated at the end of Mailbox migration to Office 365 for further analysis.
These are the features that make the modern approach better than the manual one. Moreover, this approach can easily bypass all the limitations of the manual method. This tool is developed using advanced algorithms that protect the integrity of users’ data throughout the Email migration to Office 365.
Understanding the Working of this Software!
Now, follow the detailed steps mentioned below with their respective images to execute your operation:
Step-1. Launch the tool and select Office 365 as the source & destination platform.
 Step-2. Select the categories that you want to migrate like emails, contacts, calendars, tasks & documents. To transfer only the selective information, apply the date range filter.

Step-3. Enter Office 365 admin Login information to both the source & destination accounts and then validatehe permissions.
 Step-4. Add users through the User group mapping feature for adding users in bulk. There are various options available here to add users.
 Step-5. Validate the users, check the green icon & then click on next.
 Step-6. Finally, users just have to click on the Start Migration.

Now, Understand All the Possible Manual Methods for the Email Migration to Office 365!
Four manual solutions will help in this task, and we divided the sections of each to understand them more clearly i.e.
Method 1. Outlook Import/Export
This is a straightforward method, and for this, you need Outlook installed in your system to proceed –
Phase 1. Export Emails from the Source Account
- Open Outlook > File > Open & Export > Import/Export > Export to a file.
- Click Next, select the Outlook Data File (.pst) > Next.
- Choose the email account for exporting.
- Now, select the destination to save the resultant PST & click Finish.
Phase 2. Import Emails to Office 365
- Run the Outlook configured with your Office 365.
- Afterward, select the File > Open & Export > Import/Export.
- Now, hit Import from another program or file and click Next.
- Then, choose Outlook Data File (.pst) and click Next.
- Lastly, browse to the .pst file > select your import options > Finish.
Method 2. Use IMAP Migration for Email Migration to Office 365
This is technical but one can make this efficient by following the stepwise instructions mentioned below –
- Login to the Office 365 Admin Center.
- Select the Exchange > Migration > More > IMAP migration.
- Now, create a CSV file with the following headers: Email Address, Username, Password.
- Provide the credentials for the source & target accounts.
- Afterward, within the Exchange Admin Center > Add > IMAP migration.
- Finally, upload the CSV file and follow the prompts to proceed with the transition.
Method 3. Manual Forwarding
Manual forwarding is a good trick to migrate the data, but some users are unable to utilize this effectively. So it is recommended to go through the steps carefully & implement them wisely for a Email migration to Office 365-
- Open your source email account.
- Choose the emails for the migration.
- Now, hit Forward & enter your proper O365 email, and send them.
- Log in to your Office 365 account, and migrate forwarded emails to the desired folders.
Method 4. Traditional Method to Migrate Emails to Office 365!
Now the traditional method is quite difficult to perform as it involves the core technical knowledge of PowerShell Scripts. Therefore, even the IT admins of recognized organizations face difficulties in performing this method.
Microsoft hasn’t provided any direct solution for this operation. Hence, Powershell is the only Manual method to execute this task. Cloud to Cloud migration through the manual method is not easy at all. Although, there are modern solutions that we’ll discuss later.
Let’s proceed with Email migration to Office 365 using the PowerShell method:
Password Resets in Batches
- With the name “password.csv.”, create a Spreadsheet in Excel.
- Now create two columns with the name ‘upn’ & ‘password’.
- Put all the account credentials in this document spreadsheet.
- Open the MS Exchange PowerShell command prompt & run the following cmdlets:
- Import-CSV password.csv|
- %{Set-MsolUserPassword –userPrincipalName $_.upn -NewPassword $_.newpassword -ForceChangePassword $false}
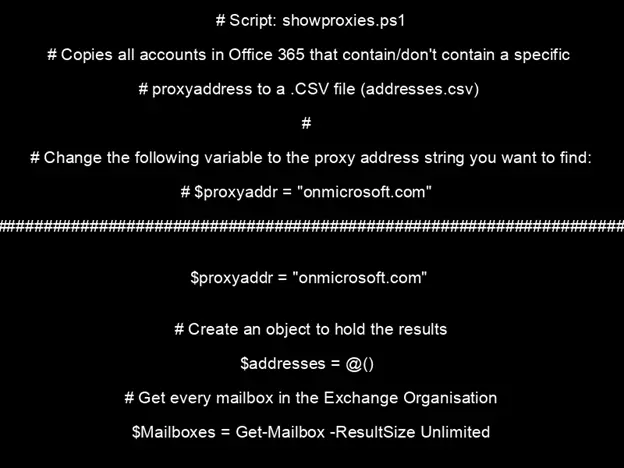
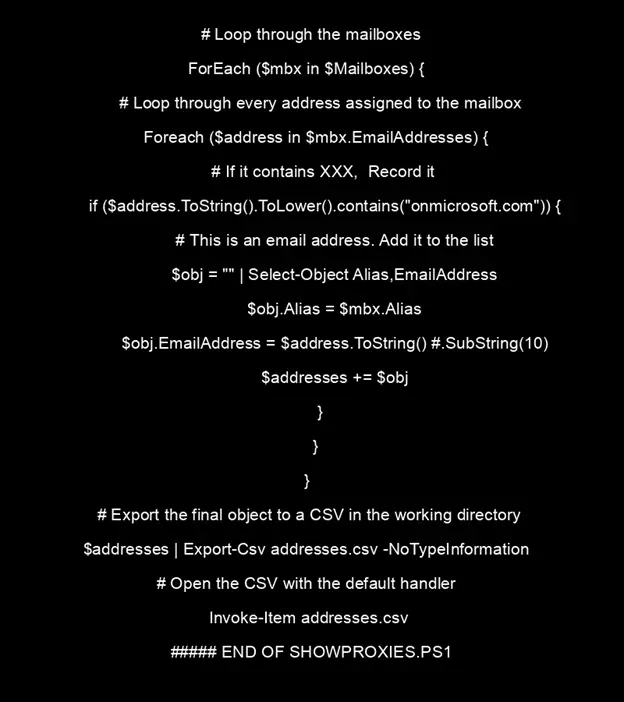
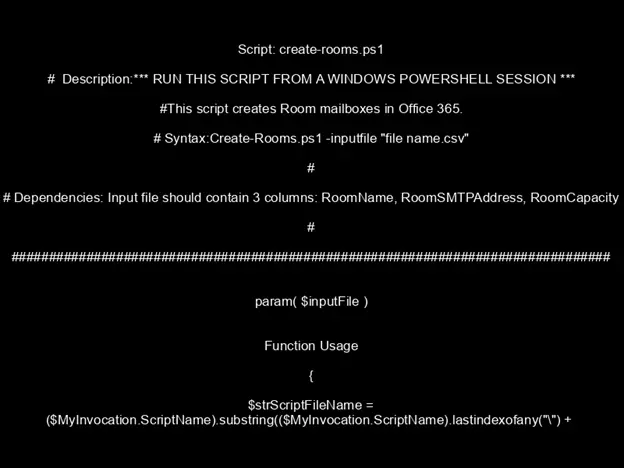
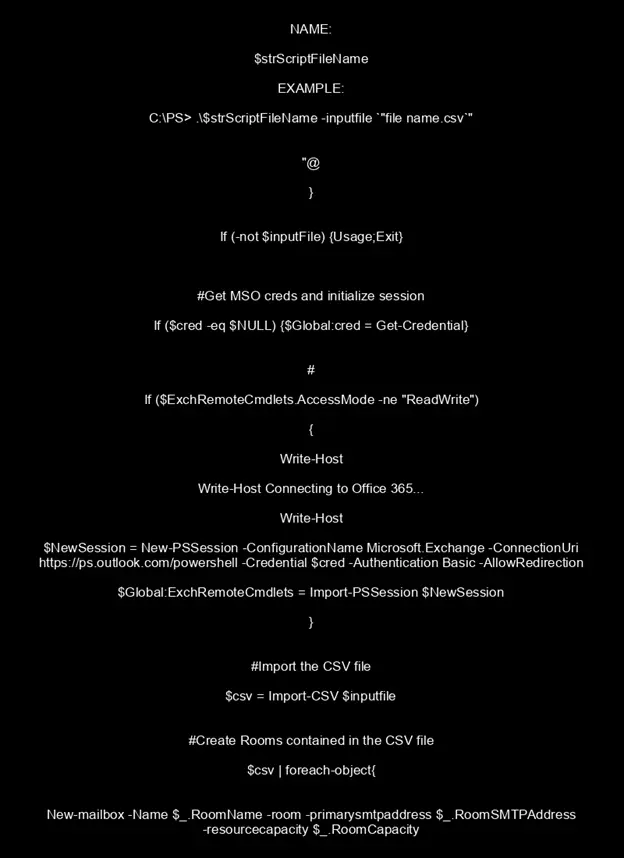
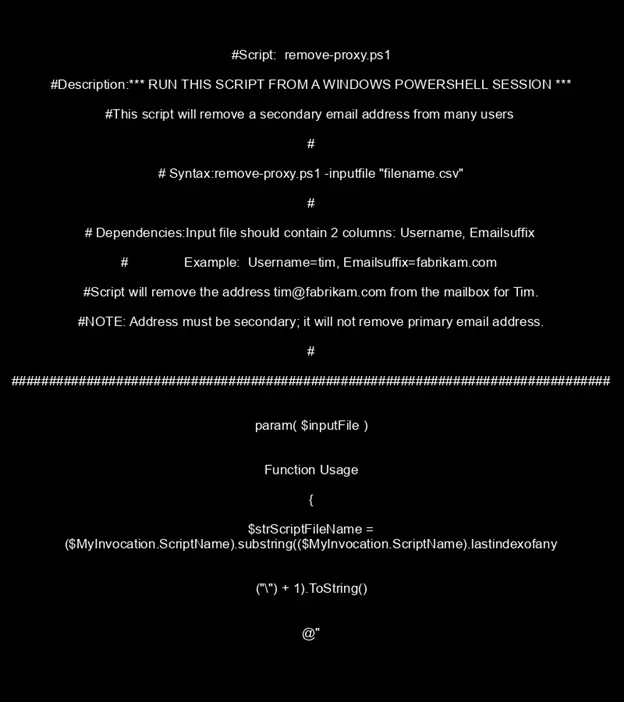
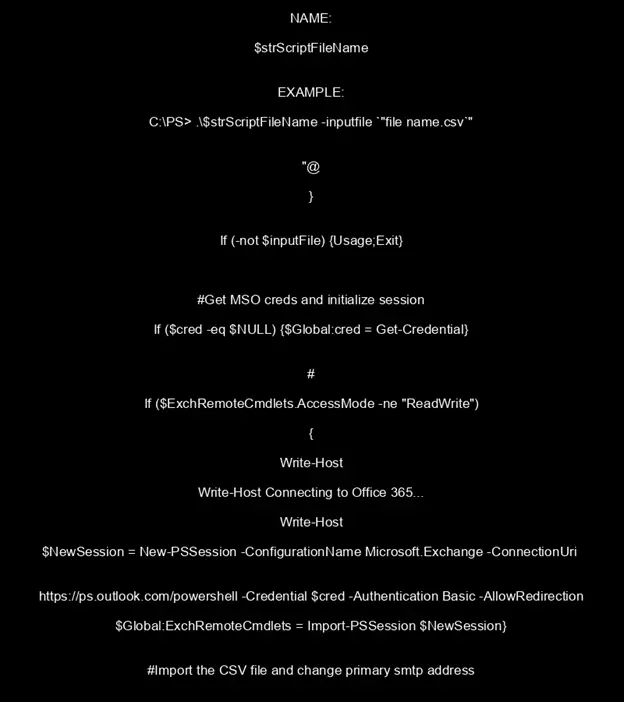
Now Simply run the scripts shown in these 6 images below very carefully without any errors to migrate mailbox data to exchange online.
Bottom Lines!
In this write-up, we’ve successfully discussed the manual & modern methods for Email Migration to Office 365. Now, it’s easier to say that we learned how the modern solution avoids the risks involved in the traditional method. The right method & tool plays a vital role in such data migration projects. If you are going to perform this operation sooner or later, this article provides a great insight into the operation. Carefully, follow the steps and you can easily accomplish your goal.


