Active Directory Migration Process – Overcoming Challenges & Ensuring Success!


There are various scenarios when performing an Active Directory (AD) migration, each requiring careful planning. It is a complex process that requires many things to be prepared. In this guide, we outline a step-by-step Active Directory migration process to make the transition easier and quicker.
Migrating data between two AD environments can be complex due to the need to move several objects which are users, groups, computers, printers, and others. A well-structured AD migration process ensures a smooth and disruption-free transition. Carefully planning each stage makes this transition hassle-free.
Let’s join us, and explore all the essential steps to complete the migration with minimal disruptions and errors!
What is Active Directory Migration?
Active Directory migration is the process of transferring user data, groups, and other directory objects from one Active Directory (AD) domain or forest to another. It requires careful planning to minimize downtime and preserve security policies & data hierarchy. In various cases, we have to initiate this task like upgrading to newer versions of Windows Server, restructuring an organization, or merging multiple domains.
To resolve this query i.e. what is Active Directory migration? Here we will learn the complete AD Migration project plan to migrate data from current AD including User Accounts, Group Memberships, Organizational Units, Computers, Group Policies, Service Accounts, DNS Records, Shared Resources, Trusts, Applications, and Security Identifiers simultaneously. Ensuring the data hierarchy and completing the task in minimum time is our preference.
Why Does the Active Directory Migration Matter?
AD migration becomes crucial for those organizations who are looking to maintain, upgrade, or restructure their IT infrastructure. Here’s why AD migration matters:
- Streamlines IT management by consolidating domains.
- Ensures smoother access and better system performance for end users.
- Minimizes hardware and software overhead by optimizing AD infrastructure.
- Centralizes user access control and strengthens security policies across environments.
Common Issues in Active Directory Domain Transitions
Several challenges can occur during the Active Directory migration process. Some of the key challenges are as follows.
- Application Compatibility – During the migration some of the applications are compatible with certain server names, and user names. However, after the migration, they did not become compatible easily including domain name changes, user account and group dependency issues & legacy authentication method incompatibility.
- Security Concerns – The user accounts & memberships also migrate then the issues of passwords occur.
- Data Loss – Migrating all of the resources, users, groups, and computers causes chances of error and data loss.
- Downtime – If you do not follow the right plan, then the whole organization has to face downtime. As a result, the business is affected.
- User Disruption – User disruption also happened after the migration because they needed to reset their passwords, change the way of login, and many more.
These challenges can cause disruptions unless properly addressed. Therefore, to avoid these hurdles, go through each mentioned step to make migration a breeze!
Steps for Active Directory Migration Process!
Proper planning and methods are essential for all the transition whether you migrate Office 365 users to another Tenant or Active Directory between domains. That’s why we divided the whole procedure into 10 steps to make it easier for a user to understand and proceed with the transition with ease. In this AD migration process, we going to learn:
- Step 1. Create a Comprehensive Strategy
- Step 2. Design the Target Domain
- Step 3. Prioritize AD Security
- Step 4. Prepare Forests and Domains
- Step 5. Transfer FSMO Roles from Current Domain Controllers
- Step 6. Decommission the Domain Controller
- Step 7. Upgrade Domain and Forest Functional Levels
- Step 8. Plan the Migration
- Step 9. Execute the Active Directory Migration
- Step 10. Validate Post-Migration Results
Step 1. Develop a Detailed Plan
A detailed plan is the essential step for the Active Directory migration. You need to prepare a detailed plan for the successful AD migration.
- Identify all of the factors that can affect the process of AD migration.
- Prepare an ordered list of resources to provide the sequence of the migration.
- Have a schedule for the migration.
- Get ready all of the required software and hardware.
- Ensures the existing AD does not have the vulnerabilities.
Step 2. Destination Domain Design
After having a detailed plan for the migration now it’s time to focus on the destination domain design. You need to go through the below factors in the destination domain before performing the migration.
- Scalability – Ensures the scalability of the destination domain. It should be able to handle multiple users at the same time so that you are not required to perform AD migration again.
- Performance – The domain should be efficient so that you do not need to face downtime due to which the chances of business loss are increased.
- Security – The domain should be secure enough so that your data privacy is maintained.
Step 3. Focus on AD Security
Before performing the Active Directory migration process, go deep dive into the existing Active Directory security.
- Verify the state of the environment and identify all the security gaps in the system such as weak passwords and unsecured systems.
- Make sure that firewalls are configured and passwords are secured. Weak passwords and unsecured systems can create security issues during the migration
Step 4. Prepare Forests and Domains
The preparation of forests and domains is performed within two phases. The first is to verify that you are not using FRS. In the earlier version of Windows, the domain controllers supported the DFS for replication. Check the FRS by running the command in the PowerShell.
dfsrmig/getglobalstate
In the second phase of the forest and domain preparation using the adprep. Run the following commands
Adprep/forestprep
Adprep/domainprep
Now, it’s time to promote the servers to domain controllers. You need to run the below commands in the PowerShell.
Install-WindowsFeature -Name AD-Domain-Services -IncludeManagementTools

Install-ADDSDomainController -CreateDnsDelegation:$false -InstallDns:$true -DomainName "tailwindtraders.com" -SiteName "Default-First-Site-Name" -ReplicationSourceDC "DC01.tailwindtraders.com" -DatabasePath "C:\Windows\NTDS" -LogPath "C:\Windows\NTDS" -SysvolPath "C:\Windows\SYSVOL" -Force:$true
The first command is to install the necessary roles and services required for the migration. The second command is for the customization of the domain name, and site name.
Step 5. Transfer FSMO Roles from Existing Domain Controllers
Now, is the time to transfer the FSMO roles in the Active Directory migration process. To locate the first and domain FSMO roles, run the below commands.
Get-ADDomain | Select-Object InfrastructureMaster, RIDMaster, PDCEmulator

Get-ADForest | Select-Object DomainNamingMaster, SchemaMaster
To shift the FSMO roles to a new domain controller, run the below command
Move-ADDirectoryServerOperationMasterRole -Identity TargetDC -OperationMasterRole SchemaMaster, DomainNamingMaster, PDCEmulator, RIDMaster, infrastructure master
Step 6. Demote the Domain Controller
Now demote the existing domain controllers having the earlier versions. Through this, the domain controller removes the role and goes back to the standard server role. If the domain controller has to be demoted is it of the Windows Server 2008 R2 or previous? They use the dcpromo wizard to remove the AD domain services. If you are using the Windows Server 2012 or later then use the below command.
Uninstall-ADDSDomainController -DemoteOperationMasterRole -RemoveApplicationPartition
Step 7. Upgrade Domain and Forest Function Level
Now the existing domain controllers having earlier versions are removed. Now raise the domain and forest function level. Windows Server 2016 is the highest one which is supported by Active Directory. Run the following commands for the upgradation of Domain and Forest Function levels during the Active Directory migration process.
Set-ADDomainMode -identity tailwindtraders.com -DomainMode Windows2016Domain

Set-ADForestMode -Identity tailwindtraders.com -ForestMode Windows2016Forest
Step 8. Migration Planning
Plan the migration carefully which includes:
- Select the Names for the source and destination AD forest and domain.
- Plan the Organizational unit (OU) structure to meet the requirements of the organization.
- Plan the group policies settings for the AD DS forest.
- Make the complete list of the objects that need to be migrated.
- Identify the apps for the migration because they are the interdependent components.
Step 9. Perform Active Directory Migration Process
Now, it’s time to learn about the solution to initiate the AD migration process. Two preferred methods are mainly used for migrating the data between two ADs i.e. ADMT and SoftwarePro Active Directory Migration Tool. Below are the details and the step-by-step instructions for the same.
Solution 1. ADMT Tool
The ADMT tool is offered by Microsoft for small transitions. Using this admins can move data between different AD domains, forests, or organizational units (OUs). With this, you require a proper Active Directory migration checklist because this tool is complicated to use. Additionally, it supports only On-Premise AD migration, not AD to Azure AD. Still, if you prefer this for transition, then the steps are as follows:
Step 1. Download ADMT and sign in with the destination domain credentials.
Step 2. Now after opening the ADMT tool, go to Action > User account migration wizard and Next.
Step 3. Choose the source and destination domains.
Step 4. Load all the users for the migration and press OK.
Step 5. Now select the targeted organizational unit and move Next.
Step 6. Tick the option of “Do Not Migrate source object if a conflict is detected in the domain” in the dialog box of conflict and Next.
Step 7. Finally, verify the migrated users in the destination Active Directory.
You can also choose the Expert’s recommended tool for the successful migration. Through this, you do not need to face the ADMT limitations.
Solution 2. Professional Tool
The Expert-Recommeded AD Migration Solution can make the process of migrating Active Directory objects between different domains, forests, or organizational units (OUs) a breeze! With its self-explanatory interface, administrators can manage large-scale migrations with ease. It supports a variety of features such as bulk migration, password synchronization, and the ability to handle domain and forest trust relationships. Throughout the procedure, if you face any issues, then go to the official page of this solution and click on Contact Us. The technical teams will assist you further.
Check the free version now!
Stepwise Instructions for the Migration
Below are all of the steps that need to be executed for the seamless Active Directory migration process.
Step 1. Download and Enter the administrator as the default details in the admin and password field.

Step 2. Enter the Domain Name and IP address then click on Save and Continue.

Step 3. Add a second domain name.

Step 4. Click on the first domain fill in the required credentials and save.

Step 5. Load all the active directory objects.

Step 6. Complete the credentials of the destination domain.

Step 7. Load the essential active directory objects.

Step 8. Click on the Migration button to create the migration scenario.

Step 9. Create a task by clicking on the migration scenario & select the data and Save.

Step 10. Hit three dots to map the objects.

Step 11. Select any option from the merge or create and click on the start button.

Step 12. Click on the Start button to initiate the migration. The process gets completed after a while.

Step 13. To update the destination user passwords, use the sync feature.
- Download and set up the AD Watcher tool.
- Reset the source user password.
- The passwords synced to the destination user automatically.
Step 14. Go to the Report section and generate the reports.

Step 10. Verify the Result After the Active Directory Migration Process
- Go through the results after the migration by the generated report after performing the migration.
- After the data is migrated to the expected location, then inform all the users. Stopped all the activities in the previous Active Directory.
- Make sure that DNS is updated with the Reverse or Forward zones.
- Perform a complete checkup of the data after the migration by the personnel.
- If there are any data is missed after the migration, then use the advanced Delta option to complete the migration.
- Make sure that all of the required data is successfully migrated, then disable the previous Active Directory.
Case Study: Active Directory Migration Process
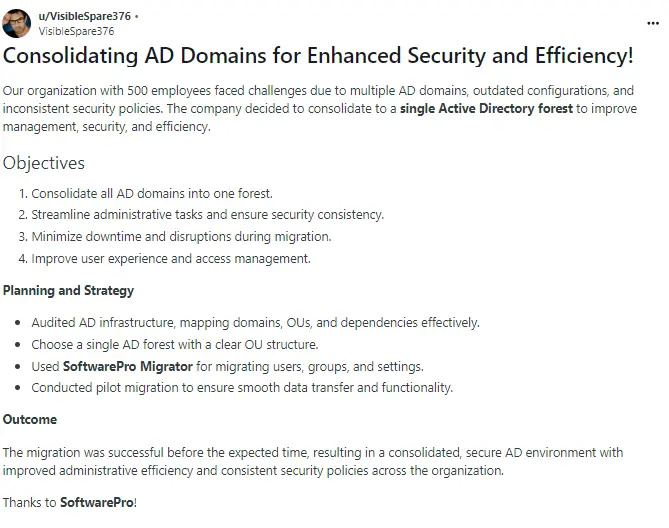
Proof: Reddit
Final Words
Here we have explained, the complete Active Directory migration process. All of the steps are necessary to get the expected results. Make sure that all of the commands of the PowerShell should be executed by the personnel. Also check at least once after the migration that all of the users, groups, computers, and application works as per the requirement. Active directory best practices are necessary but opting for the best migration method is crucial.
It is recommended to use the mentioned specialized software for this task to ensure desired results. Otherwise, there is a huge risk of data loss and descriptions with other solutions. I hope, after reading this complete guide you have the proper knowledge of this transition. From now on, you don’t need to depend on any other resources for the same process.
